Last Updated: September 18, 2026
A left-handed gaming mouse can collect skin oils, dust, crumbs, and moisture in the same places as any other mouse—but its thumb rest, side buttons, and palm contours may make those areas harder to reach. If you clean it carelessly, liquid can seep into switches or the sensor, loosen labels, damage rubber grips, or leave residue that makes tracking and clicking worse. The safest approach is a low-moisture clean using a soft brush, microfiber cloth, and cotton swabs.
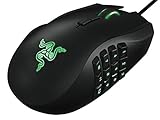
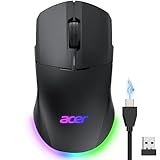
This method works for wired and wireless models, including ergonomic designs such as the $149 Razer RZ01-01050100-R3M1 Naga Left-Handed and budget dual-mode mice such as Acer’s $21.99 2.4GHz wireless and wired gaming mouse. Always check your mouse’s manual before removing any panels or feet; routine cleaning should not require opening the shell.
As an Amazon Associate we earn from qualifying purchases at no extra cost to you. Product prices and availability are accurate as of the date shown and are subject to change.
Quick answer: Our top pick in 2026 is the Microfiber cloth — our #1 rated choice. See the full ranked comparison, alternatives and buying advice below.
What You Need
| Item | Why | Optional? |
|---|---|---|
| Microfiber cloth | Wipes away oils without shedding much lint or scratching smooth plastic | No |
| Soft, clean brush | Loosens dust around buttons, seams, the scroll wheel, and side controls | No |
| Cotton swabs | Reaches narrow gaps and textured grip areas | No |
| 70% isopropyl alcohol | Helps remove oily residue from hard, nonporous surfaces | Yes |
| Distilled water | Dilutes or replaces alcohol for a mild wipe | Yes |
| Wooden toothpick | Gently lifts compacted debris from seams; less likely to scratch than metal | Yes |
| Compressed air | Can move loose dust from difficult recesses | Yes |
| Small bowl or tray | Prevents screws, wireless receivers, and detachable parts from getting lost | Yes |
Use a clean, dry work surface with enough room to turn the mouse over. Avoid household glass cleaner, bleach, acetone, disinfecting sprays, abrasive sponges, paper towels, and oil-based cleaners. They can cloud plastic, strip coatings, or leave a film. Never pour or spray cleaner directly onto the mouse.
Step-by-Step
1. Disconnect and prepare the mouse (2 minutes)
Save any work, then unplug a wired mouse from the computer. For a wireless model, switch it off and remove the battery if the design allows it. If the battery is built in, turn the mouse off and disconnect its charging cable. Remove the USB receiver and place it in a tray; do not clean it with liquid.
Move the mouse to a clear, dry area. If the cable is detachable, disconnect it at the mouse rather than pulling on the cord. Take a quick photo of any removable weights, covers, or battery orientation before removing them.
2. Remove loose dust and crumbs (3 minutes)
Hold the mouse with the sensor facing downward and gently shake it over the work surface. Do not hit it against your hand or desk. Use a soft brush to sweep around the left-hand thumb rest, side-button cluster, scroll wheel, seams, and the edges of the main buttons.
If you use compressed air, keep the can upright and use short bursts from about 6 inches away. Do not tilt or shake the can while spraying. Avoid forcing air directly into the sensor opening or spinning the scroll wheel aggressively, since liquid propellant or excessive speed can stress internal components.
3. Clean the exterior shell (5 minutes)
Lightly dampen a corner of a microfiber cloth with distilled water or 70% isopropyl alcohol. The cloth should feel barely damp, never wet enough to drip. Wipe the palm rest, left-side contours, mouse buttons, underside edges, and cable jacket.
Use straight, gentle passes rather than vigorous scrubbing. For a soft-touch or rubberized surface, test the solution first on a small, inconspicuous underside area. If the finish becomes sticky, dull, or discolored, stop using alcohol and switch to a water-dampened cloth. Keep liquid away from openings, seams, speaker-like vents, the sensor, and charging contacts.
4. Detail the buttons and thumb controls (4 minutes)
Wrap a barely dampened cotton swab around the edges of each button, especially the 12-button thumb grid found on some left-handed MMO mice. Rotate the swab as it picks up residue, and replace it when it becomes dirty. Use a dry swab afterward to remove moisture from tight gaps.
Press each button only lightly while cleaning around it. Do not wedge a toothpick underneath a switch or pry up a keycap unless the manufacturer specifically says it is removable. A wooden toothpick can lift a visible crumb from a seam, but it should never be pushed into the housing.
5. Clean the scroll wheel and sensor area (3 minutes)
Brush around the scroll wheel while turning it slowly with one finger. Wipe the wheel’s accessible surface with a nearly dry cotton swab. Do not soak the wheel or flood the gap around its axle.
Turn the mouse over and use a dry microfiber corner around the sensor window. If a smudge remains, use a dry optical-safe lens cloth or a cotton swab barely dampened with distilled water, followed immediately by a dry swab. Never scrape the sensor window and never spray cleaner into it.
6. Wipe the feet and underside (2 minutes)
Dust can collect around the glide feet, where it may affect movement. Brush around each foot and wipe the broad underside with a barely damp cloth. Avoid catching the cloth on the edges of the feet. Do not remove them for routine cleaning; replacement feet are often adhesive-backed and may not reseal cleanly.
Clean the cable separately, if applicable, by pulling it through a lightly damp microfiber cloth. Keep liquid away from the connector and allow the cable to dry before reconnecting it.
7. Dry completely and test (10 to 30 minutes)
Leave the mouse unplugged and switched off in a ventilated room. Surface moisture usually evaporates quickly, but wait at least 10 minutes after a light wipe; wait 30 minutes if a larger area became damp. Do not use a hair dryer, heater, or direct hot air.
Reconnect the mouse only when it is completely dry. Test the cursor, left and right clicks, scroll wheel, side buttons, and any lighting. Move it across a clean mouse pad and check for skipping, unexpected clicks, or a sticky button. If anything behaves abnormally, disconnect it and allow additional drying time.
Mistakes to Avoid
- Spraying the mouse directly: Liquid can travel through seams faster than you can wipe it away.
- Cleaning while powered: Disconnecting reduces the risk of short circuits and accidental inputs.
- Using too much alcohol: Alcohol may damage rubberized coatings, printed markings, or adhesive.
- Spinning the wheel with compressed air: High speed can put unnecessary stress on the wheel mechanism.
- Opening the shell unnecessarily: This can void warranty coverage and expose delicate switches and ribbon cables.
- Using metal tools: Pins, knives, and screwdrivers can scratch plastic or damage a switch.
- Ignoring the mouse pad: A dirty pad can transfer oils and dust back onto a freshly cleaned mouse.
How Often
For everyday gaming, wipe the exterior and thumb area once a week and perform the detailed cleaning above every four to eight weeks. Clean more often if you eat at the desk, use hand lotion, share the mouse, or notice a gritty scroll wheel. Brush loose debris from the mouse pad weekly and wash it according to its care label.
After heavy use, a quick 30-second wipe of the palm rest and side buttons can prevent buildup. Let sweat or spilled drinks dry before cleaning; dried residue is easier to lift with several gentle passes than with one aggressive scrub.
When to Call a Pro or Replace
Stop using the mouse and seek professional service if liquid entered the shell, the device becomes unusually hot, you smell burning, or it repeatedly disconnects. A repair shop may be able to replace a failed switch, scroll encoder, cable, battery, or charging port, but the cost can approach that of a replacement.
Replacement is reasonable when clicks double-register, the sensor skips on multiple clean surfaces, the battery no longer holds a useful charge, or the glide feet are worn and replacement parts are unavailable. Before buying, compare the repair estimate with current prices: basic dual-mode gaming mice may cost about $20 to $40, while specialized left-handed MMO models can be around $100 to $170. Keep warranty terms in mind before opening the housing.
FAQ
Can I use disinfecting wipes on a left-handed gaming mouse?
Only if the manufacturer specifically approves them. Many disinfecting wipes contain ingredients that can discolor plastic, dry rubber, or leave residue. A nearly dry microfiber cloth with distilled water is the gentlest default. For oily hard plastic, a small amount of 70% isopropyl alcohol on the cloth—not on the mouse—may be suitable after a hidden-spot test.
How do I clean a sticky side button?
Disconnect the mouse, brush around the button, and work a dry cotton swab along its perimeter. If residue remains, use a swab barely dampened with distilled water and follow with a dry swab. Do not force the button, flood the gap, or disassemble the mouse unless the manual permits it.
Can I wash the mouse under a faucet?
No. Even water-resistant-looking designs are not necessarily sealed. Running water can reach switches, sensors, bearings, charging contacts, and battery components. Clean only with controlled, low-moisture wipes and allow the mouse to dry fully before use.
Why does my mouse still track poorly after cleaning?
Check the sensor window and mouse pad first, then test on a plain, clean surface. Transparent, reflective, glass, and heavily textured surfaces can interfere with optical tracking. If the cursor still skips on several suitable pads after the sensor is clean, the sensor, cable, wireless connection, or internal electronics may need service.
Ready to decide? Our #1 pick for 2026 is the Microfiber cloth.
Live price & availability on Amazon.
Related Reviews & Guides


Left-Handed Gaming Keyboard Guide

How to Wrap Gifts for Left Handed People (2026): Step-by-Step